

Page Model
Page Models are the paradigm, or pattern, that defines what a Page is. When you make a Page content entry in the Content section of Builder, Builder uses the Page model to create that Page content entry.
About Page models
By default, a Builder Space comes with one Page model, which most people use for the content between the header and footer. Uses for Page models include:
- Homepage
- Content pages such as About, Partners, Documentation, and Marketing
- Landing pages
With just one Page model, you can create countless pages with unique URLs and edit those pages in the drag-and-drop interface of the Visual Editor.
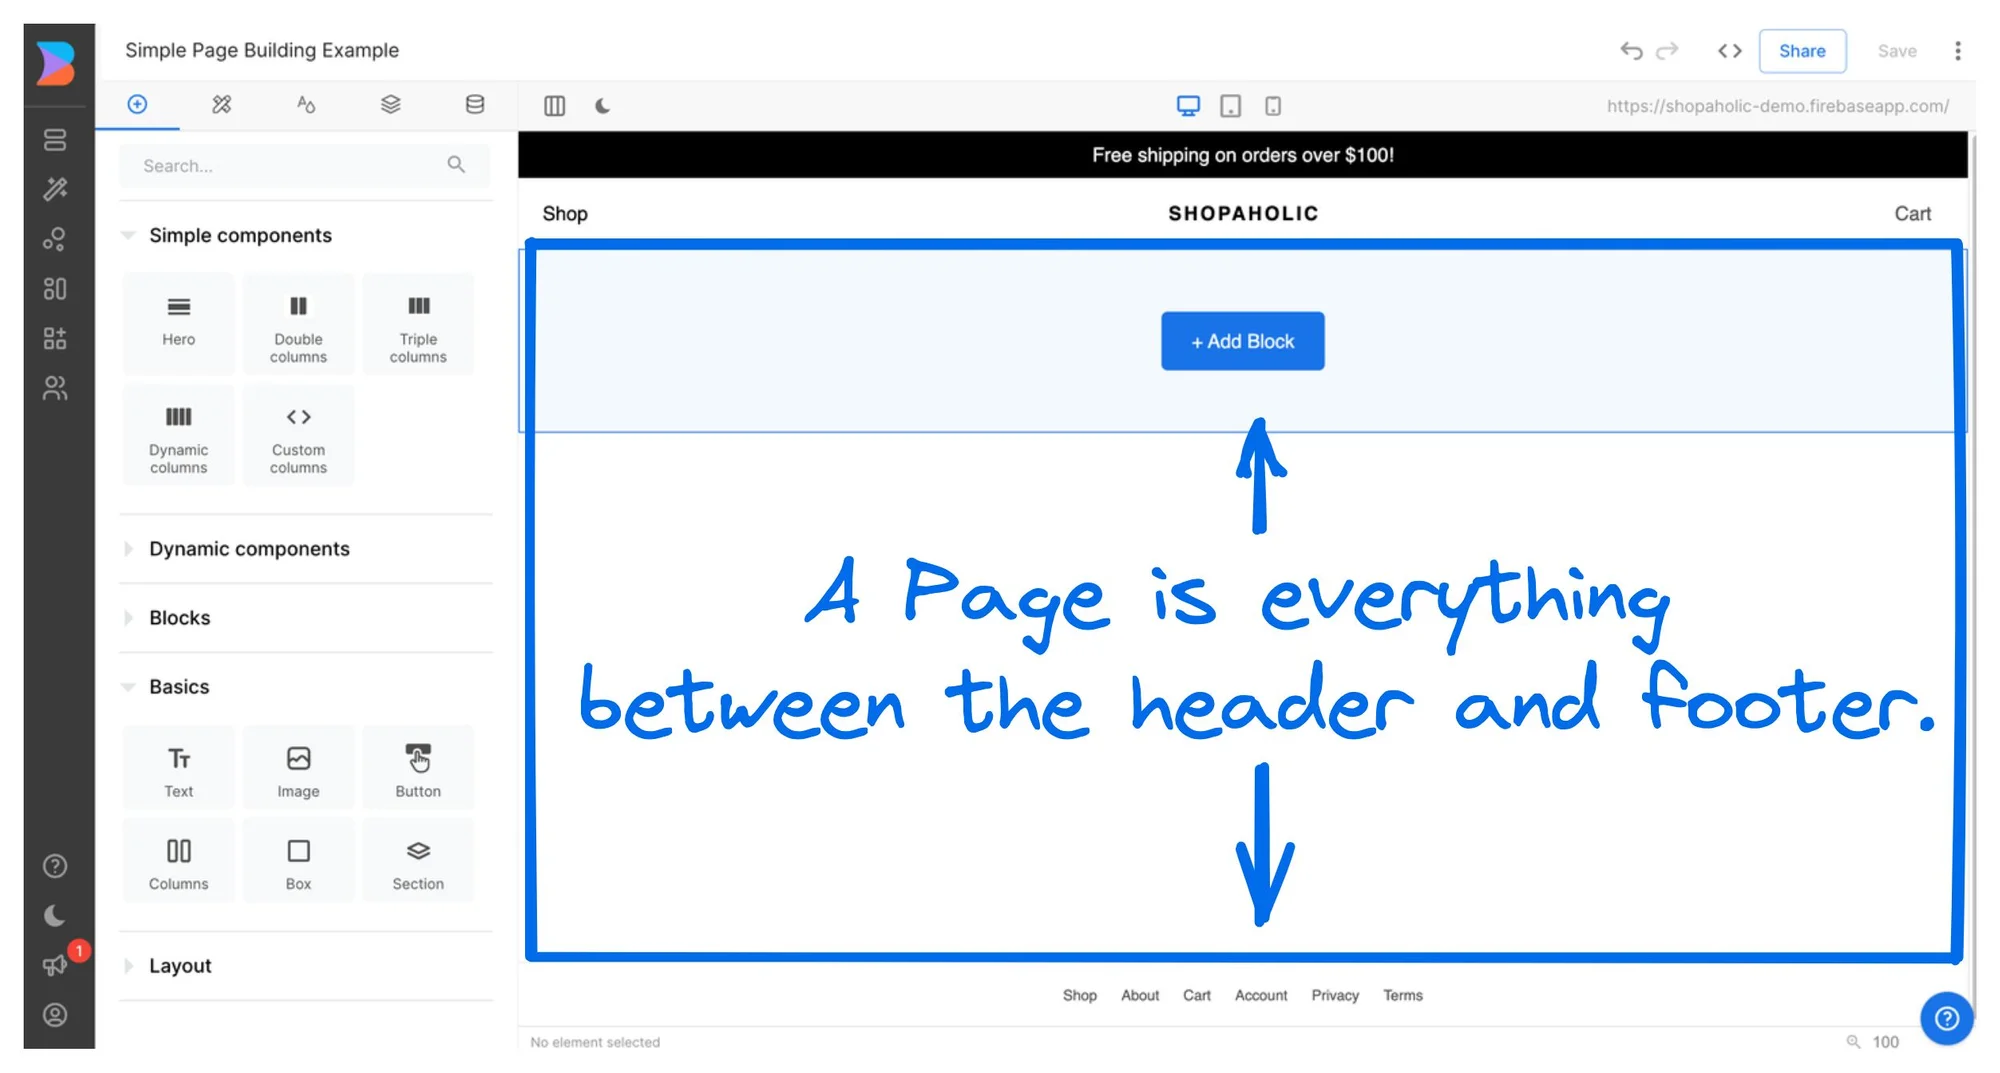
The following image delineates a typical Page within the Visual Editor. A Page is everything between your header and
footer.
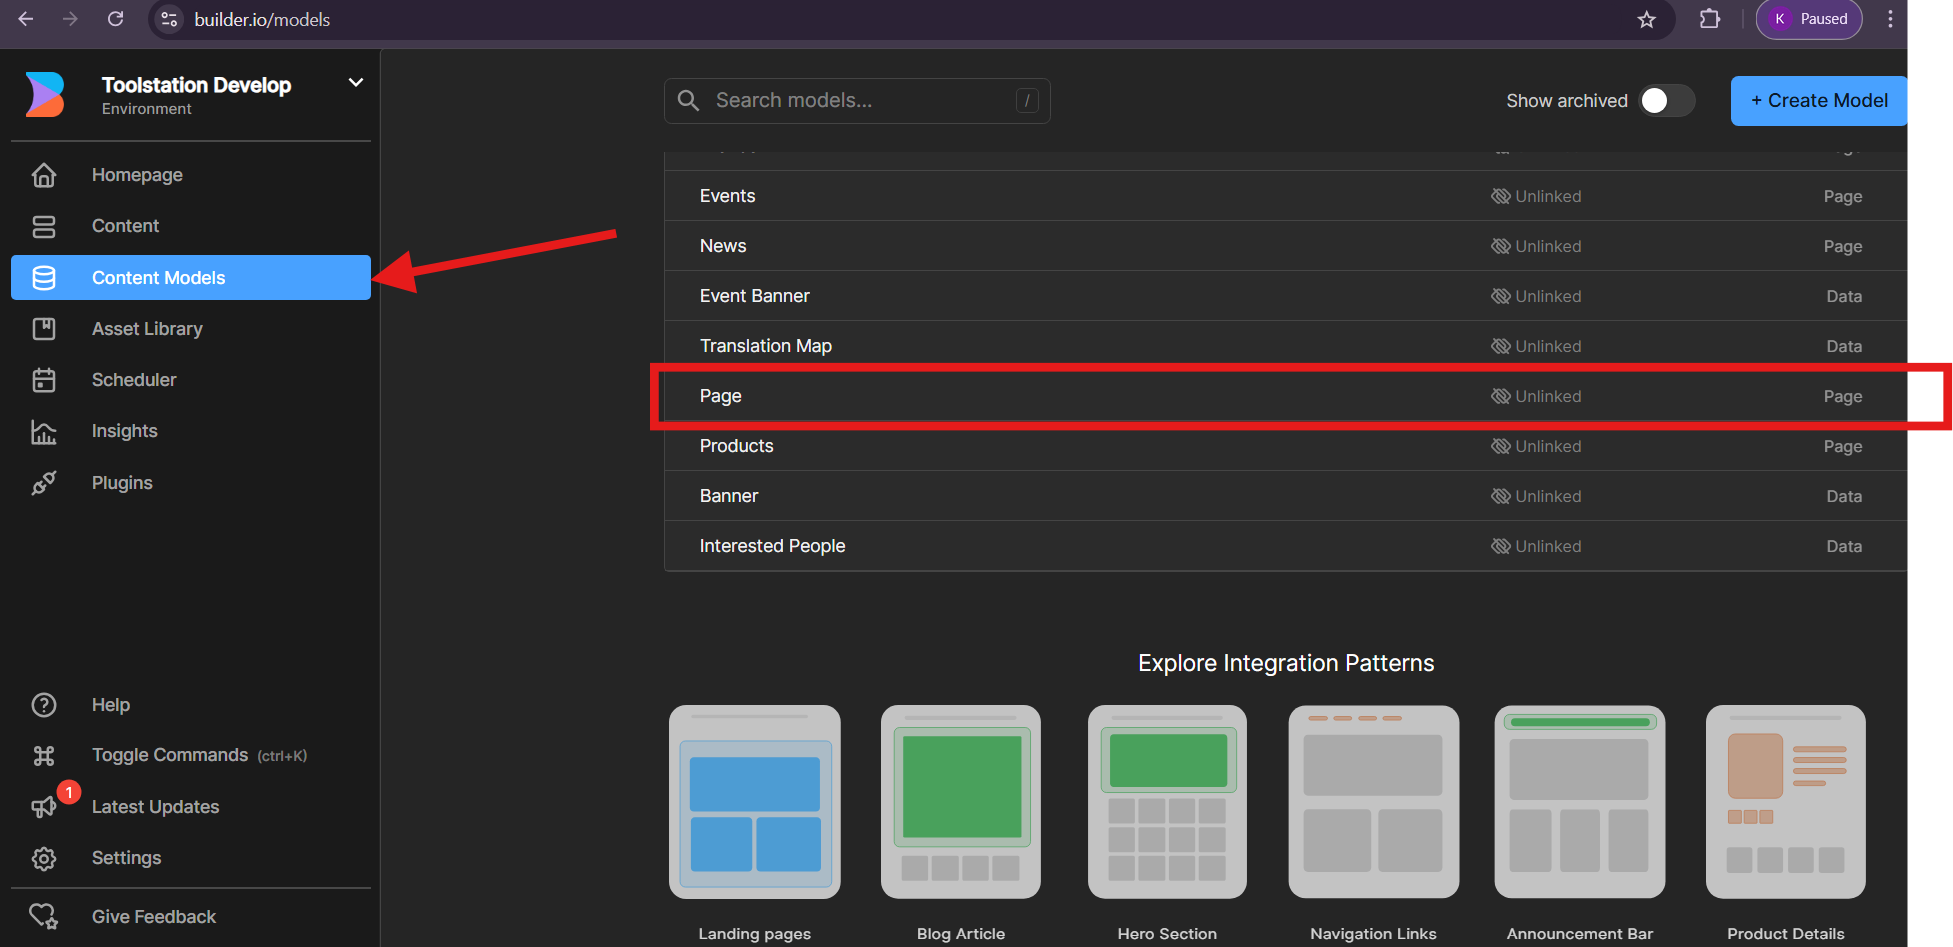
Finding the Page model
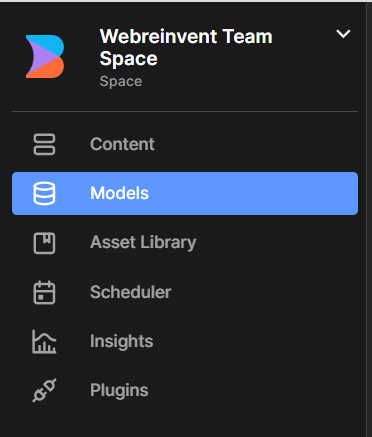
To view the details of the Page model(s) in a Space, do the following:
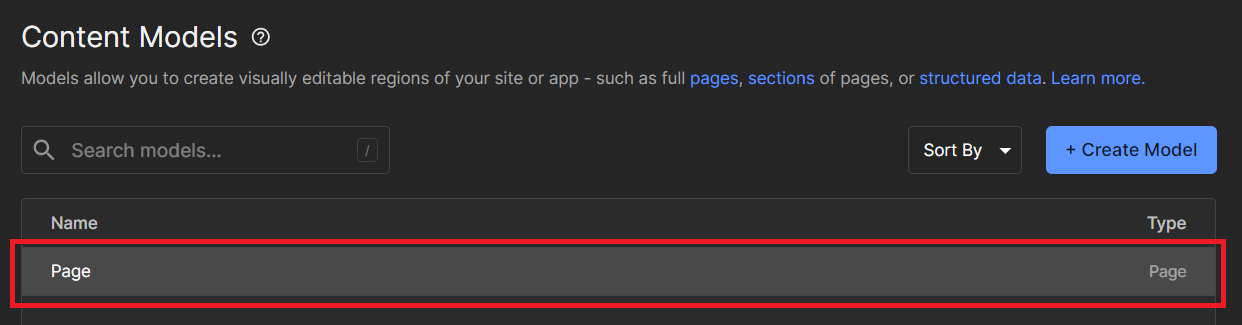
- Go to the Models section of the Builder UI.
- Select the Page model.
From within the Page model, you can edit and add fields. For details on fields in models, refer to Custom Fields.
Creating a Page model
To create a new Page model, make sure to give it a helpful name and Description so that users know how to use the model.
- Go the Models section of the Builder UI.
- Click the + Create Model button.
- Choose Page.
- In the Model Display name field, enter the name you'd like this model to have when listed in the Models section of Builder. You can edit this later if you change your mind.
- Name the model and fill out the Model Description field.
- Click Create.
- Add any needed custom fields.
- The model saves automatically.
To use the new Page model, integrate with your codebase and then your teammates can create content entries in the Visual Editor.
The following video shows how to create an example Docs Page model with a Description. The description of "Standard Documentation Page" displays under the new model in the Content section of Builder so users understand when to use the Docs Page model.
Integrating Page with Nuxt-3
This Quickstart shows how to integrate page building with Builder.io in a brief format. We recommend this as the best way to get started with the Builder platform.
Steps for setup
1) Install the Builder.io dependencies.
NOTE: Keep checking the sdk-vue version and associated changelog on regular basis.
npm install "@builder.io/sdk-vue" --save
2) Add the SDK's nuxt module @builder.io/sdk-vue/nuxt in the nuxt.config.ts file
export default defineNuxtConfig({
  ...,
  modules: [
    '@builder.io/sdk-vue/nuxt'
  ],
  ...
})
3) Run development server
npm run dev
4) Replace the default <NuxtWelcome /> component with NuxtPage component in app.vue file and wrap it inside a NuxtLayout component like a typical Nuxt application
<NuxtLayout>
  <NuxtPage/>
</NuxtLayout>
5) Add your builderApiKey in .env file
NUXT_PUBLIC_BUILDER_API_KEY=YOUR_PUBLIC_API_KEY
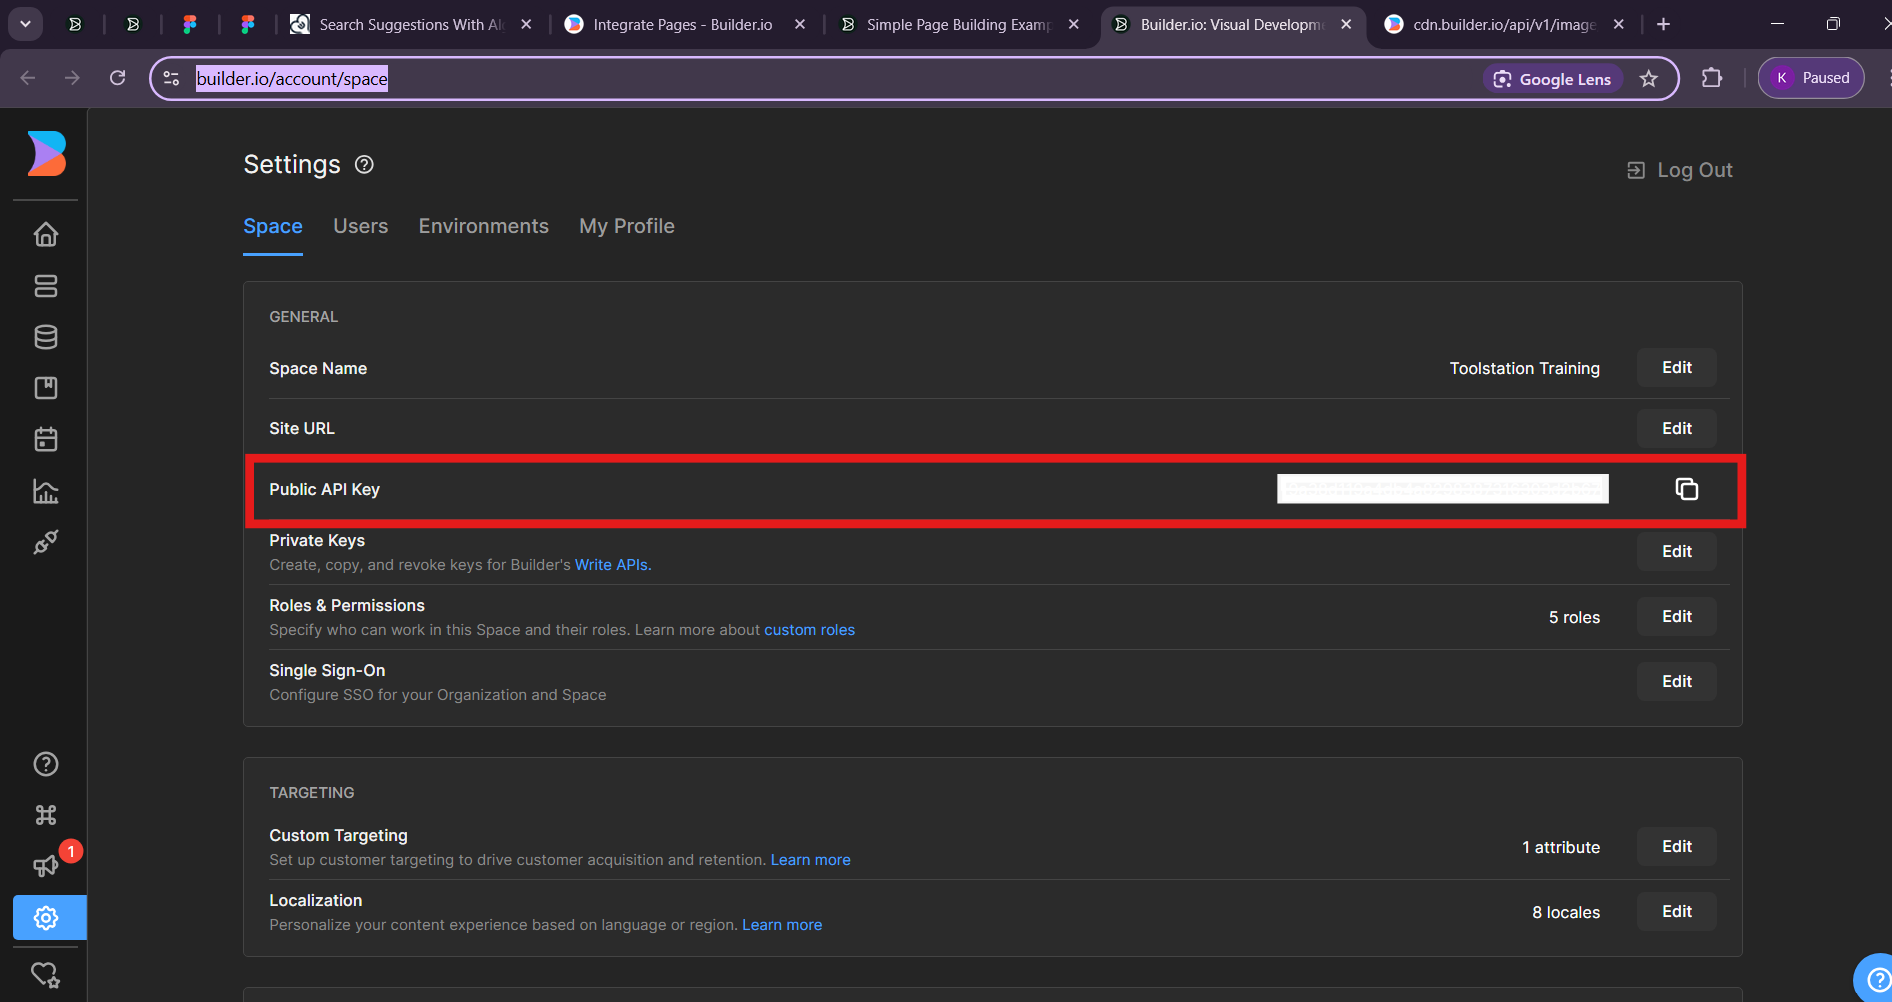
6) Replace the YOUR_API_KEY value with your space Public API Key, which you can find in
the Account Settings in Builder.
7) Configure builderApiKey in your nuxt.config.ts file
export default defineNuxtConfig({
  ...,
  runtimeConfig: {
    public: {
      builderApiKey: ''
    }
  },
  ...
})
8) Create pages directory at root location and create a new file with name [page].vue inside the pages
directory.
9) Paste below code in [page].vue file.
<template>
  <div id="home">
    <!-- If content is true, render the Builder content using the
    Content component (previously, RenderContent) and the "page" model. -->
    <div v-if="content || isPreviewing()">
      <Content
        model="page"
        :apiKey="config.public.builderApiKey"
        :content="content"
      />
    </div>
    <!-- If canShowContent is false, show a "Content not Found" message. -->
    <div v-else>Content not Found</div>
  </div>
</template>

<script setup>
import {Content, fetchOneEntry, isPreviewing} from "@builder.io/sdk-vue";
const route = useRoute();

const config = useRuntimeConfig();

const content = await fetchOneEntry({
  model: "page",
  apiKey: config.public.builderApiKey,
  userAttributes: {
    urlPath: route.path
  }
})
</script>
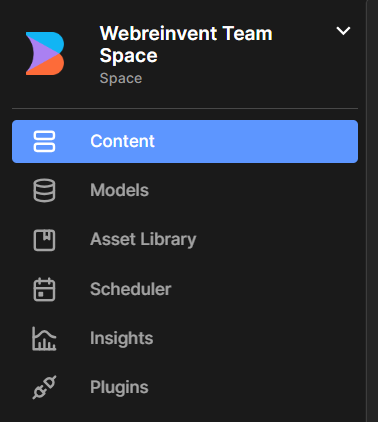
10) Go to the Models section in Builder.
 11) Choose your
 Page model.
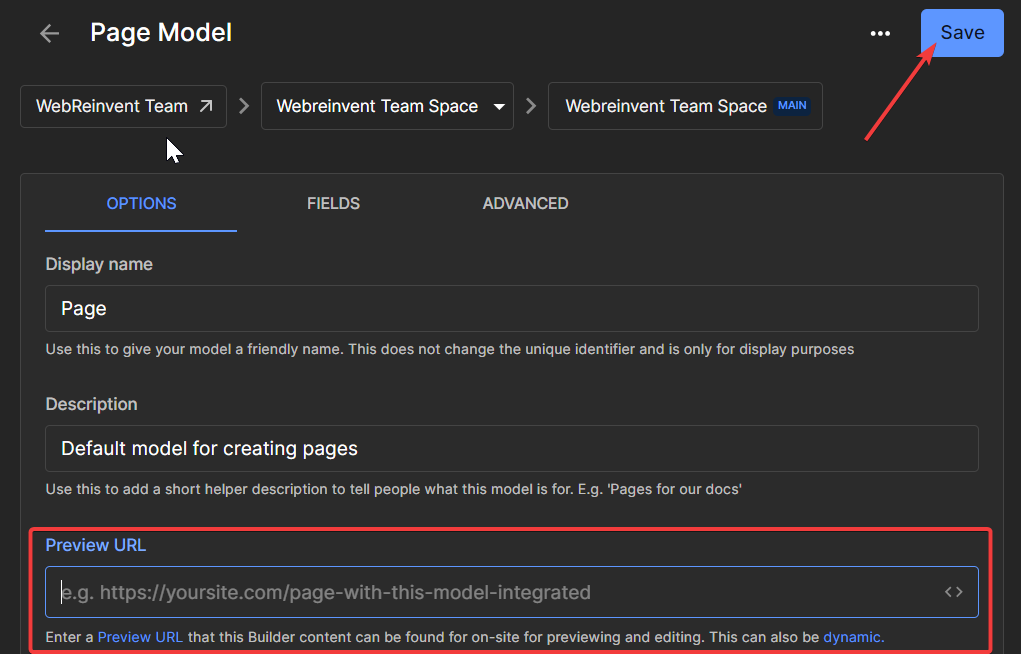
12) Set the Preview URL to http://localhost:YOUR_PORT where YOUR_PORT is the port number for your app. Be
sure to include the http:// and Click on Save button.
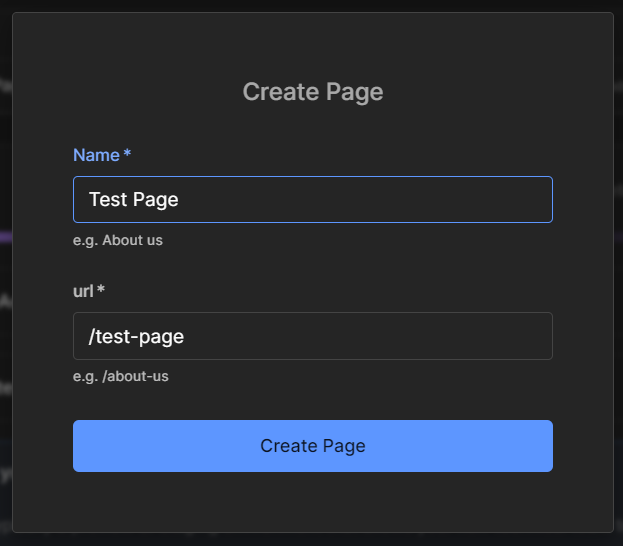
13) In the Content section of
Builder, create a new blank Page and name it something like "Test Page"
.

14) Go to http://localhost:3000/test-page, where test-page is the name you gave your page.
15) Add some minimal content, such as a Text block with some copy such as "Yes I did it!" and Click the Publish button.
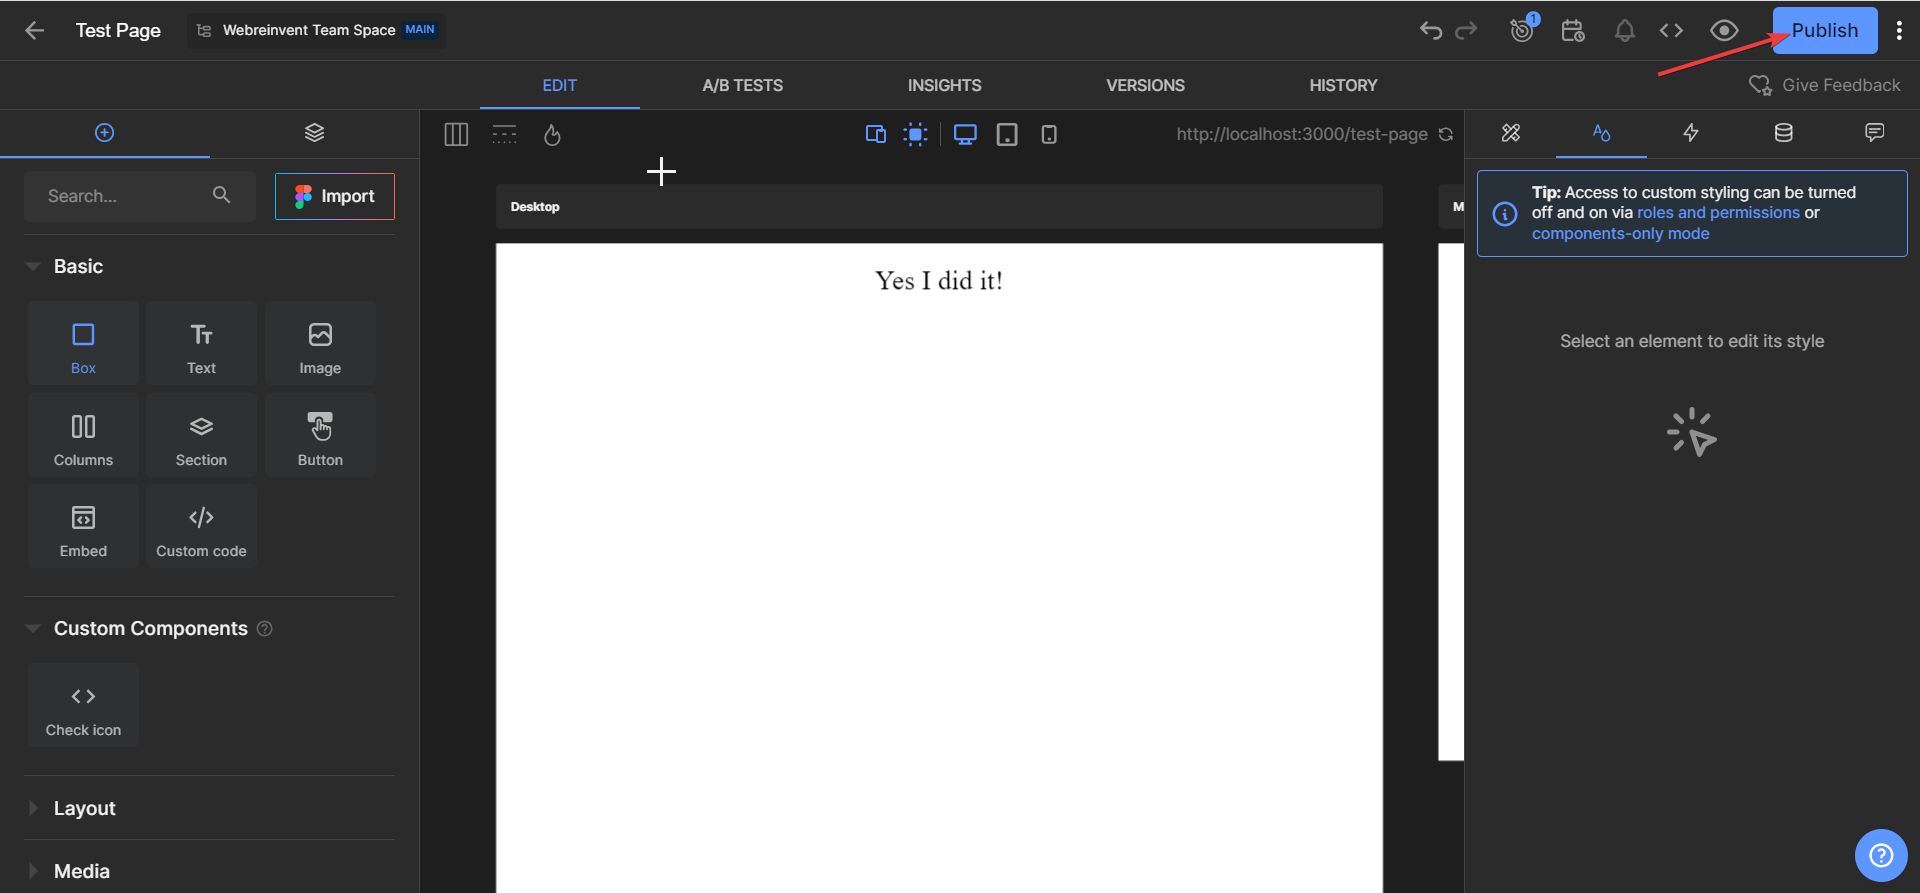
16) Now check out your work. Well done!
Setup in Project
Builder component to connect app
We have these 3 components to connect builder with our app which are:
1) TsContent.vue
<template>
  <div>
    <Content
        :model="props.model"
        :content="content"
        :api-key="api_key"
        :customComponents="getRegisteredComponents()"
    />
  </div>
</template>

<script setup lang="ts">
import {fetchOneEntry, Content, isPreviewing} from '@builder.io/sdk-vue';
import { REGISTERED_COMPONENTS } from '~/utils/init-builder';
import {BuilderService} from "../../services/builder.service";

type Props = {
  customComponents?: any,
  path?: string,
  model?: string
}

const route = useRoute();

const props = withDefaults(defineProps<Props>(), {
  model: 'page'
})

const config = useRuntimeConfig();

const content = ref(null)
const api_key = config.public.builderApiKey;

try {

  content.value = await new BuilderService(api_key).getItem(props.model,{
    urlPath: props.path || route.path,
  });

} catch (e) {

}

const getRegisteredComponents = () => {
  return REGISTERED_COMPONENTS;
}
</script>
2) TsContentPage.vue
<template>
  <div :style="{ backgroundColor: `${rootStore.page_background_color}` }">
    <div v-if="content && api_key">
      <Content
        model="page"
        :content="content"
        :api-key="api_key"
        :customComponents="getRegisteredComponents()"
      />
    </div>
    <div
      v-else
      role="status"
      class="flex items-center justify-center h-56 max-w-sm bg-gray-300 rounded-lg animate-pulse dark:bg-gray-700 m-auto my-20"
      style="height: 400px"
    >
      <svg
        class="w-10 h-10 text-gray-200 dark:text-gray-600"
        aria-hidden="true"
        xmlns="http://www.w3.org/2000/svg"
        fill="currentColor"
        viewBox="0 0 16 20"
      >
        <path
          d="M5 5V.13a2.96 2.96 0 0 0-1.293.749L.879 3.707A2.98 2.98 0 0 0 .13 5H5Z"
        />
        <path
          d="M14.066 0H7v5a2 2 0 0 1-2 2H0v11a1.97 1.97 0 0 0 1.934 2h12.132A1.97 1.97 0 0 0 16 18V2a1.97 1.97 0 0 0-1.934-2ZM9 13a2 2 0 0 1-2 2H5a2 2 0 0 1-2-2v-2a2 2 0 0 1 2-2h2a2 2 0 0 1 2 2v2Zm4 .382a1 1 0 0 1-1.447.894L10 13v-2l1.553-1.276a1 1 0 0 1 1.447.894v2.764Z"
        />
      </svg>
      <span class="sr-only">Loading...</span>
    </div>
  </div>
</template>

<script setup lang="ts">
import { fetchOneEntry, Content, isPreviewing } from "@builder.io/sdk-vue";
import { REGISTERED_COMPONENTS } from "~/utils/init-builder";
import { BuilderService } from "../../services/builder.service";
import { datadogLogs } from "@datadog/browser-logs";
import { useI18n } from "vue-i18n";
const { t } = useI18n();

const route = useRoute();

const config = useRuntimeConfig();

const rootStore = useRootStore();

const content = ref();
const page_title = ref("Toolstation");
const api_key = config.public.builderApiKey;

try {
  const route_name_array = route.name.split("___");
  let path = route.path;

  if (route_name_array.length > 1) {
    path = route.path.replace(route_name_array[1] + "/", "");
    path = path.replace(route_name_array[1], "");
  }

  let options = {
    fields: "data",
  };

  async function fetchPageContent(urlPath: string) {
    let userAttributes = {
      urlPath,
    };

    const { data } = await useAsyncData("builderPage", () =>
      new BuilderService(api_key).getItem("page", userAttributes, options)
    );

    if (data.value.data.backgroundColor) {
      rootStore.page_background_color = null;
      rootStore.page_background_color = data.value.data.backgroundColor;
    }

    return data.value;
  }

  content.value = await fetchPageContent(path);

  const capitalizedPageTitle = computed(() => {
    const processTitle = (title: string) => {
      // Replace hyphens with spaces
      return title.replace(/-/g, " ");
    };

    if (content.value?.data?.seoMetaTags?.title) {
      return processTitle(content.value.data.seoMetaTags.title);
    } else if (content.value?.data?.title) {
      return processTitle(content.value.data.title);
    }
    return "Toolstation"; // default title
  });

  if (!content.value) {
    content.value = await fetchPageContent("/404");

    useHead(() => ({
      status: 404,
      title: t("pageNotFound", "Page not found"),
    }));

    throw createError({
      statusCode: 404,
      statusMessage: "404 - Page Not Found",
    });

    /*datadogRum.addError('Page Not Found', {
      error: new Error('Page Not Found'),
      url: route.path,
      statusCode: 404,
    });*/

    datadogLogs.logger.error("404 - Page Not Found", {
      url: route.path,
      referrer: document.referrer, // Add the referral path
      statusCode: 404,
    });
  }

  useHead({
    title: capitalizedPageTitle,
    meta: [
      {
        name: "description",
        content:
          (content.value &&
            content.value.data &&
            content.value.data.seoMetaTags &&
            content.value.data.seoMetaTags.description) ||
          "Beste gereedschap & bouwbenodigdheden voor de professional.",
      },
      {
        name: "keywords",
        content:
          (content.value &&
            content.value.data &&
            content.value.data.seoMetaTags &&
            Array.isArray(content.value.data.seoMetaTags.keywords) &&
            content.value.data.seoMetaTags.keywords.length > 0 &&
            content.value.data.seoMetaTags.keywords.toString()) ||
          "Toolstation",
      },
    ],
  });
} catch (e) {
  useErrorHandler(e);
}

onMounted(() => {
  useCompareStore().clearCompareProducts();
});

const getRegisteredComponents = () => {
  return REGISTERED_COMPONENTS;
};
</script>
3) TsContentStatic.vue
<template>
  <div>
    <Content
        :model="props.model"
        :content="props.content"
        :api-key="api_key"
        :customComponents="getRegisteredComponents()"
    />
  </div>
</template>

<script setup lang="ts">
import { Content } from '@builder.io/sdk-vue';
import { REGISTERED_COMPONENTS } from '~/utils/init-builder';

type Props = {
  content?: any,
  model?: string
}

const props = withDefaults(defineProps<Props>(), {
  model: 'page'
})

const config = useRuntimeConfig();

const api_key = config.public.builderApiKey;

const getRegisteredComponents = () => {
  return REGISTERED_COMPONENTS;
}
</script>
Connect Builder Pages with nuxt app
Create a page in dir pages/[...slug].vue :
<template>
  <TsContentPage />
</template>


<script setup lang="ts"></script>
Setting the Page Model preview URL
To enable Builder to open your site in the Visual Editor, provide a URL that Builder can open which has the Builder rendering component in it.
- Go to Models and choose the Page model.
- Set the Preview URL to
http://localhost:<your-port>, where<your-port>is the port your app is using. Be sure to include thehttp://.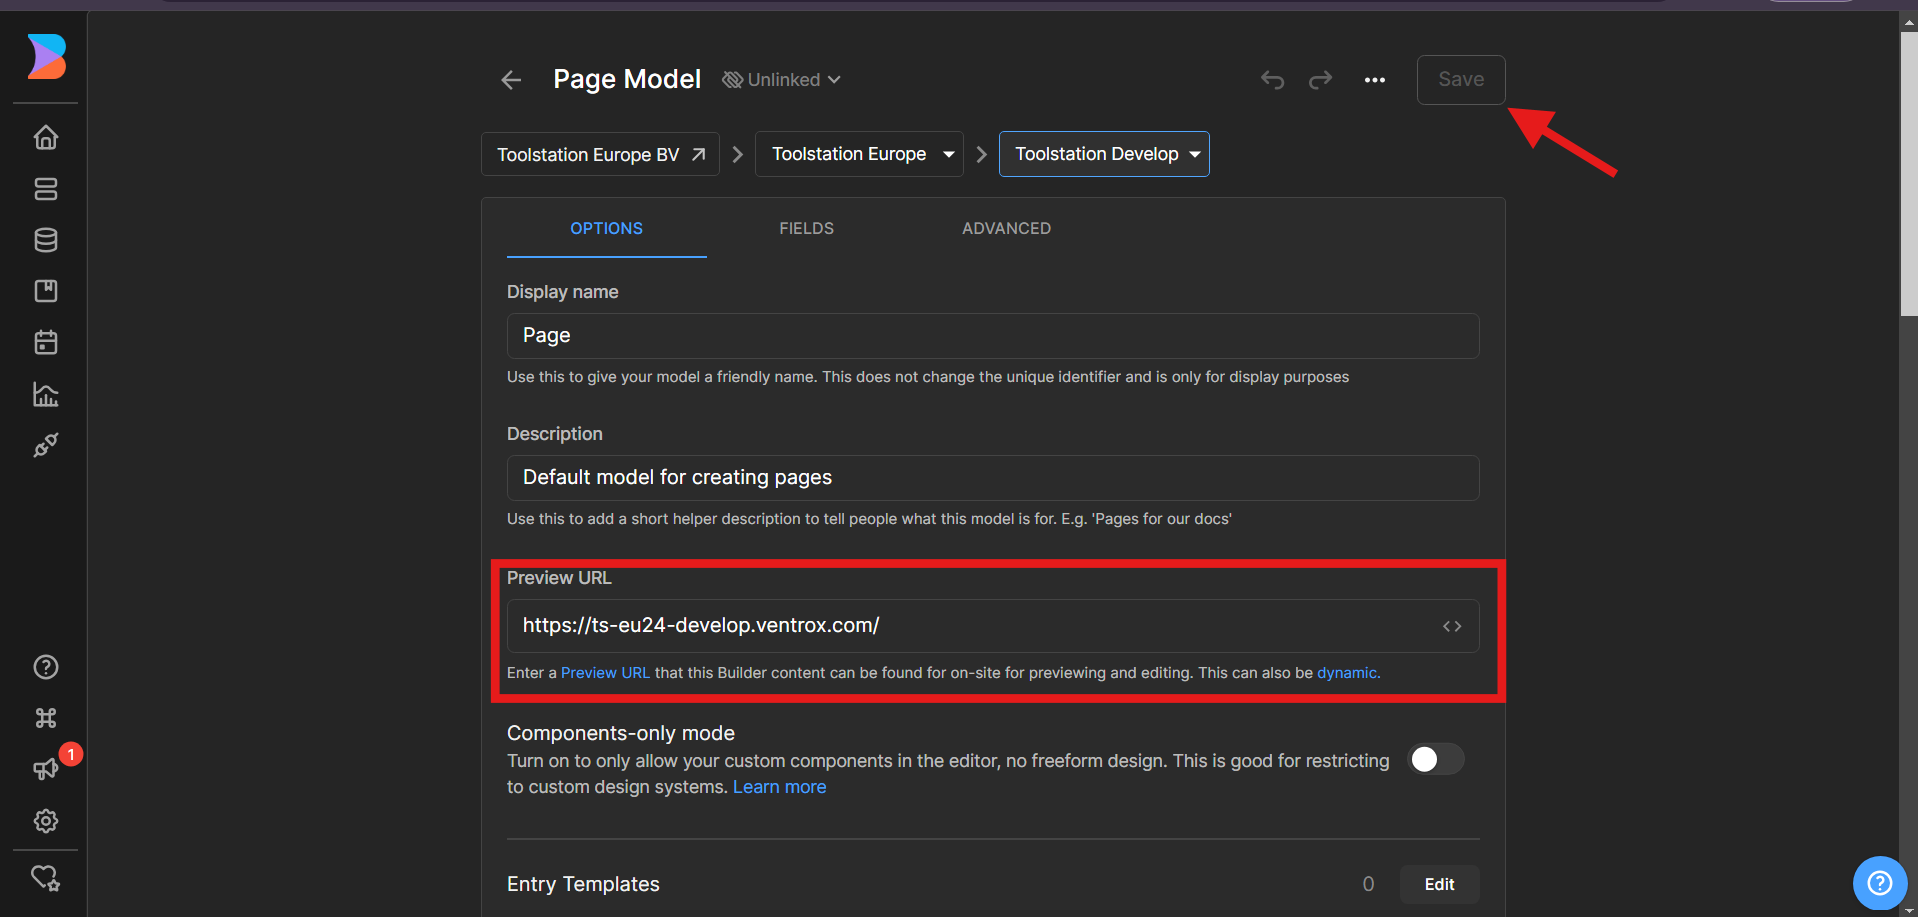
- Click
Save.